Showing posts with label kids. Show all posts

Friday, June 29, 2012

On Barf, Birdseye, and Burp Cloths


Why I Prefer Birdseye 3 Ply Prefolds for my HoopDeeDoo Burpcloths.

{warning: super grody baby talk ahead!}

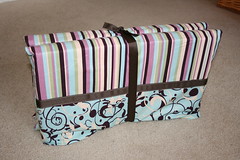
I've had some people ask about the burpcloths I'm making for the shop, so let me address it here:  I use 3 ply birdseye weave prefold diapers, which are lighter weight.  Many boutique burp cloths are 6 ply, but I don't use them anymore.

Why?


{fabric: ikea}


They don't fit the HoopDeeDoo philosophy of pretty + practical.  

My own personal experience as a mom comes into play here.  Sorry to get graphic, but I had a baby with severe reflux, so I know burpcloths.  I tried them all.   I gave up on the puffy 6 plys very quickly.  A 6 ply Chinese prefold gauze weave diaper is great for liquids (ahem: urine) and keeping it "inside" a diaper, but it simply doesn't absorb thicker liquids as quickly (ahem: vomit).   So you get the dreaded runoff or smearing.  Pretty, but not practical.

I eventually just bought a pack of plain white birdseye 3 plys and used them forever.  They worked like a charm and took up less room in the diaper bag, but were kind of boring. Practical, but not pretty.

I always wanted the kind of burp cloths that I am now making for my shop.


{fabric: alexander henry.  find in the shop here.}

Yes, the thick ones seem so luxurious and pretty on the boutique shelf.  But baby barf ain't pretty, folks.  Young mamas in the trenches of reflux and sleep deprivation need absorbency and less barf on their backs.

Just keepin' it real.

Put yourself in  a new mama's shoes for a moment.  Let's say it's Mother's Day and you got a 5 minute hot shower as your gift, and you're disturbingly excited about going to church because it's the first time you've left the house all week, and your precious 3 week old horks all over that fat fluffy burp cloth which doesn't absorb anything so all of the putrescence streams down the back of your new Ann Taylor sweater set (ok, it's a hand me down from your mother in law, but new to you) - yes, it will be the end of the world.  I promise.  You will first cry the ugly cry, and then you will crack and start using hand towels as burpcloths until you can get some decent absorbent burpies, even if they are ugly, just as long as they suck up the vomit and fold down small enough to get into the diaper bag.

(Completely fictional story.)


{fabric: alexander henry.  find in the shop here.}

Anyways, to keep things both pretty and practical, I chose an absorbent birdseye cloth as the base and added a cotton fabric strip to pretty it up.  Prewashed on hot.  Machine dried on hot.  Cause new mamas want to know that the thing is going to survive some harsh treatment. 

Give me practical any day of the week.  But make it pretty while you're at it.  :)


{fabric: vintage.  find in the shop here.}
post signature
Pin It!

Friday, March 9, 2012

days 7,8,9


day 7: something you wore 


(my favorite dirty skechers which look cuter than tennis shoes but i can stand in them all day)


day 8: window (taken a day late, oops)


(my tomato plants, longing to actually graduate to the garden)


day 9: red


(brisco and his favorite kong, with a little peanut butter to make it yummier)

#marchphotoaday


post signature
Pin It!

Tuesday, March 6, 2012

days 4, 5, 6


day 4: bedside.


it's always a mess, but these are the essentials: meds, clock, lotion to make me sleepy, sudoku to make me sleepy, miscellaneous crap, surprise love notes from the girls.

day 5: smile.


how could I pick just one of these sweet smiles?  And this while K was doing her music theory homework.  happy happy happy girls.

day 6: 5pm.


on the porch, just got off the phone, with Brisco attached.  he's either the sweetest or the clingiest dog i've ever met, can't decide.


#marchphotoaday
Pin It!

Thursday, May 5, 2011

summer is coming...moms, are you ready?

Hey, friends!  The days are flying by, aren't they?  I have been trying so hard to get things done around here, because it is only a few weeks until school is out!

16 more days of kindergarten.

6 more days of preschool.

AAH!

The summer looms before me...what on earth am I going to do to keep my excessively bright, creative, and energetic children engaged all summer?

Sure, we've got camps scheduled, a family vacation, Backyard Bible Clubs, and there's always the pool.

But it's those days here and there when you hear...

"MOM, I'M BORED!"

Now, my mom's favorite answer to this problem was to hand my brother and me a mop or a toilet brush, once we were old enough to use them properly.  Oh, I firmly believe in lots of chores, yes I do.  But my kids are merely 6 and 4, so there are only so many chores they can be expected to do.

A couple of years ago, I started doing themed weeks or days during the summer.  For example, "Princess Day" required costumes, pink pancakes (made with beets instead of food coloring, of course), and we used royal titles for each other all day long.  (I really liked being called "Queen Mother.")

This year, I've got an awesome idea in my "Summer Box," thanks again to my mom, the Retired Teacher Extraordinaire.

DINOSAUR WEEK!

(I don't have any pictures of us actually doing the activities yet, because I am keeping it a surprise from the kids for now.)


We've got bones!! These are those very cool wooden dino skeleton puzzles. I'm gonna hide them in the sandbox and have the kids dig them up and attempt to put them back together.  Some of these are incomplete skeletons, which actually makes it more realistic when you think about it.   


Activity books - how to draw, word search, etc.  I also expect that my girls will need to make dinosaur models out of pipe cleaners, their current favorite sculpture medium.


My 6 year old probably knows all of these guys by sight already, but maybe these flash cards will help me keep up with her.


Let's not forget a bunch of random fossil pictures, labels, etc.  Perhaps we will use the labels to organize our drawings, or create "learning centers."

 
So, if you are wondering what to do with your kids this summer, send them to my house for Dino Week, or hit up your favorite retired teacher for some cool stuff.  And check out the Save Our Summer series on the Brassy Apple blog, one of my favorite bloggy haunts - just click this big button!


Do you have any theme ideas to share? 

P.S. a new look for the blog is on the way, keep your eyes peeled!
Pin It!

Friday, February 4, 2011

time for a giveaway!!

Hooray, it's time from another giveaway from CSN Stores! CSN Stores has over 200 online stores where you can find anything you need, whether it be swingsets, fitness equipment, or even cute cookware! 
Speaking of swingsets, I've been dreaming of spring, looking outside at our awesome playscape, which is currently covered with snow (yes, even in Austin, TX). 


We have the Gorilla Big Skye I.  My kids LOVE it!  My hubby and father-in-law put it together themselves, a big job to be sure, but it turned out great.

All year long, my kids and their friends spend hours here.


It enables me to craft, cook, or talk with my mommy friends in peace.

It has been a pirate ship, rocket ship, secret clubhouse, and who knows what else.

Sigh.  I love it so much.

Anyways, I can't fund your entire backyard remodel, but I'm giving away a $25 gift certificate, redeemable at any CSN site! 

I won't tell your kids if you decide to spend it on yourself. 

There are lots of chances to win!  Here's how:


1.  Leave me a comment!

2.  Follow my blog (Google connect or RSS), Facebook, Twitter, or tell me if you already are.

3.  Take a peek at my etsy shop and tell me something you like or want to see there.

4.  Take a peek at the CSN stores sites and tell me what you would spend your $25 on!

5.  Spread the word about this giveaway, and let me know how.

Remember to leave a SEPARATE comment for each entry - so you get all your chances to win. And be sure to include an email address in your comment or Blogger profile, so I don't have to track you down.


Contest closes Wednesday, Feb. 9, at 11:59pm CST.


P.S.  The snow has already melted, and the kids seem to be melting down as well.  Time to go PLAY OUTSIDE!!


{images copyright hoopdeedoo}


I am not being compensated by CSN for this giveaway.  This is to bless my readers!
Pin It!

Tuesday, October 19, 2010

my little model

Took some etsy listing photos with A-bug yesterday. She really enjoyed the modeling! Of course, I bribed her with cookies.

She doesn't just stand there.  Oh no.  This girl does not know how to be still. She mugs, poses, dances, spins.  She has her own inner soundtrack going at all times.  I make a game out of trying to figure out what song is playing in her mind.


"The hills are alive..."


"I feel pretty, oh so pretty..."


"Shake shake shake, shake shake shake, shake your booty, shake your booty!"

Never a boring moment with this one!

The stars and swirls apron is already up on etsy here.
Pin It!

Friday, August 27, 2010

the paint chip challenge!

I stumbled upon this challenge yesterday, and it got my mind working.  My eldest has a birthday in the fall, and we need to be thrifty with the party this year, so I am pondering an "art party."  This kiddo LOVES art projects, drawing, painting, play-doh, you name it.  She gets positively giddy over paint samples, so they would be perfect for the goody bags!


Supply list:

paint samples - the large single-color kind
cellophane bags
stickers, erasers, and other small goodies
pencil
hole punch
sharpie


I used Better Homes & Gardens paint samples from Wal-mart, which, due to incredible luck, fit perfectly into these 6" x 3.75" cellophane bags that I already had on hand.


Write your message on the paint sample, slide it into the baggie, and slide in a page of stickers facing the other way so you cover up the ugly backside of the sample.  Incidentally, I'm the world's WORST note-writer, so I try to say "thank you" in the goodie bags.  It's not how Emily Post would do it, but it's better than never getting around to it.

Now punch two holes in the top of the bag and slide a pencil through the holes.  Ta-da!  For only pennies you have a cute party favor!


We also picked up a few of the paint samples with the hole in them.  I think these make terrific gift tags!


This is a little bucket with holes already in the sides for tying a ribbon.  Full of art supplies, it would make another inexpensive yet fun gift for a creative kiddo!

By the way, immediately after these pictures were taken, the kids appropriated the paint samples for their own creative uses.  They will probably end up being placemats for the next stuffed animal tea party!

And don't tell my husband, but while I was at Wal-mart I picked up a few extra samples that would look nice on the living room wall...

Pin It!

Thursday, April 29, 2010

Tutorial: Seat Stuff Stasher, Part 3

Welcome back! I am standing in my garage, typing this up as I watch the kids play in the culdesac. Hooray for laptops!! If I can't be sewing, at least I can blog about sewing, right? Today we'll be working on the straps.


  1. Pick up your short strap pieces. Fold them in half, then stitch 1/4" along each of the long sides.


    Turn inside out and press, then tuck in the raw end 1/2". Stitch it shut.


  2. Cut a small amount of Velcro to fit on each end of the strap, hooks on one side and loops on the other (of course), and stitch them down really well. When the Velcro is fastened, your strap should again be folded in half.


  3. Sew one end of your strap, Velcro up, about 1 1/2" in from the edge of your backing fabric, and about an inch down, as shown.


  4. Now pick up your 4" wide strap piece. Fold in half lengthwise wrong sides together, press. Open back up, and fold sides in to meet at the middle line you created.


    Turn in 1" at one end. Fold together once more. Now your strip is 1" wide.


  5. Stitch around three sides, leaving the raw end open. Now cut a 3" length of Velcro. Stitch the hooks part on the finished end of the strap, 1" from the end.


    Stitch the loops part vertically on the backing fabric, 1/2" inside from one of your short straps, as shown.
    Don't worry about the other end of this strap; we will cut it to fit at the very end.

That's it for now! Next time we will do the final assembly, so stay tuned!!

Pin It!

Tuesday, April 27, 2010

Tutorial: Seat Stuff Stasher, Part 2

Ok, I know you are raring to go. Now that you have decided to make one of these, the junk in your car is driving you nuts. So turn on your iron and let's get to it!


  1. Take the two back pieces and two pocket pieces. (Set aside the strap pieces for now.) Determine which will be the top edges of all of them. Turn under each piece 1/2", press, then turn under 1" and press.


  2. Set aside the back pieces for now. Take your smallest pocket piece, fold in half, and press. Unfold and place on top of your middle pocket, line up the bottom and side edges, and pin. Sew down the fold line you just created. Be sure to backstitch well at the top.


  3. Now let's do the long elastic strap. Find your longest strip of fabric and fold in half lengthwise right sides together, press. Sew 1/4" from raw edge. Turn right side out (use a safety pin attached to one end to help you thread it through.) Press if desired.


  4. Now thread your elastic through. You will probably want to use a safety pin to help get this through, too. Be sure to anchor your other end of elastic to something so it doesn't pop through the tube. I pinned mine to the ironing board.


  5. Leave about 1/2" of elastic hanging out each end of the tube. Tuck in the fabric ends just a little bit to avoid fraying. Stitch very well just inside the fabric line.


That's it for today, next time we will work on the other straps!
Pin It!

Monday, April 26, 2010

Tutorial: Seat Stuff Stasher, Part 1


I got a new car around New Year's, and we've already put 6200 miles on it, most of those with the kids in the backseat. We keep a permanent stash of books, doodle pads, and small toys in the car to keep everyone entertained. This has pretty much all sat in a big pile between the car seats, and stuff would go flying every time I hit the brakes. Not to mention that when I would occasionally clean up the pile, I'd find a stash of moldy raisins or pretzel crumbs lurking beneath, soiling my precious brand-new upholstery!! The other day I finally decided enough is enough, and I had a couple of hours to kill, so VOILA - a Seat Stuff Stasher, customized to my car.


The bottom is elastic, so it hugs the seat instead of swinging into my preschooler's legs. The headrest strap is Velcro'd, so when she yanks on it too hard it will just fall rather than rip. And there's a place to hang a Walmart bag inside for ooky trash, as well as lots of storage for books.


You can do it too, it's not hard, I'll walk you through it!


For Part 1, let's just get all set up. Whip out your handy measuring tape and head out to the car.


GET THE FOLLOWING MEASUREMENTS:

  • The finished width and height you would like your Stasher to be. We will call these numbers "W" and "H". Mine is 12"w x 20"l.


  • The distance all the way around your seat, where the bottom strap will go. Let's call this "C" for Circumference. It may work best to use a piece of string, feeding it around snugly in the bend of the seat, all the way around to where you started. Cut the string to the exact length, then measure the string.


SUPPLIES:

  • About 1/4 yard each of 2-3 different fabrics (home decor or heavy weight preferred, for extra toughness)

  • About 12" of 5/8" wide Velcro


  • 1 -2 yards of 3/8" elastic (to fit around base of seat)


  • Thread, scissors, pins, iron, your brain, etc. A rotary cutter and self-healing mat are really helpful but not necessary.


Now it's time to cut your fabric!! My kids picked out the fabrics themselves, so they would feel like it was THEIR bag. This is a great opportunity to use up your scraps. Pull out the measurements you took earlier. Then cut:


  • Two backing pieces, W + 1" by L + 2". (For example, my W= 12" and L=20", so I cut two pieces 13" x 22".)


  • Your big pocket fabric, W + 1" square. (Mine was 13" square.)


  • Your front pocket fabric, W + 1" by W - 5". (This is just a ballpark. You can make this front pocket smaller or larger as desired. Mine was 13" x 8".)


  • Your elastic strap cover fabric, 2 " wide and as long as your fabric will allow selvedge to selvedge. If the length is less than the circumference of the seat measurement you took earlier, just cut another piece and sew them together, no biggie.


  • Your headrest strap fabric, 4" x length of fabric selvedge to selvedge. You'll be cutting this to fit later.


  • Your trash bag holder straps, two 2" x 12" pieces.


  • Your elastic, to C - W. That's circumference minus the width of your finished Stasher. Mine was 36". This is loose enough to get over the seat and lumbar support without ripping, but snug enough to not bug the driver.


Hooray! You will be ready to sew next time you sit down to work on this. I'll be back with Part 2 very soon. Thanks for playing and see you next time!!

Pin It!

Wednesday, March 31, 2010

Easter outfits for MY girls!

Some time ago, I purchased the Patchwork Twirl skirt pattern by Carla C from youcanmakethis.com. LOVE her patterns, she is very thorough. I probably could have cooked this one up on my own but when I totally rip off someone's idea, I like to give them money for it. Call me old-fashioned. Anyhoo, I had big plans to make Easter outfits for my kids.
Then I abandoned the plans, because my dad got worse, and I was up and down the highway all the time. Put the etsy shop on vacation, put my plans on hold, put life on hold.

And then, plans changed again, because I totaled my husband's car, so I couldn't go anywhere for a while. As you can imagine, I was starting to get a little bit stressed out at this point. What do I do when I get stressed out?

MAKE STUFF.

And suddenly I'm back into crafting, and let me tell you, it is GOOD THERAPY. I've had a lot of extra time around the house lately with my sweet daughters, and they make me smile so much, and they love to twirl and sing. So last week I pulled out this pattern again, and a big pile of scraps, and a couple of Target t-shirts. Voila!


I used the Moda Bake Shop tutorial for the flower. There are lots of great flower tutorials out there, but this one was specifically the look I was going for.
Did my heart good to see their faces for the big "reveal". They immediately put their skirts on and began dancing around!! I was too busy having fun with them to take a picture at that moment!!
Pin It!

Thursday, August 20, 2009

Kindermat Case

Our preschool requires a Kindermat for naptime, for sanitary reasons, with a washable cover. We leave the mat there, but we take the cover home weekly for washing. I didn't want a big puffy sleeping bag thing to lug home every week, because I am already lugging home backpacks, lunchboxes, half-dry art projects, jackets, etc. So I have always used a king-size pillowcase, which never really covered the whole thing, and didn't look cute at all, but was easily stuffed into a backpack and didn't take up the whole washing machine. Not anymore!!

IMG_4855

Cuteness can be streamlined.

Also, if I ever need to haul the whole thing home, mat and all, it does this:

IMG_4856


To see the photos better, click on the picture to go to flickr. If you are interested in a custom order, post a comment!
Pin It!

Saturday, August 15, 2009

"teecycle"

I have been looking for ways to make better use of our hand-me-downs. The Bug is getting kind of long for 2T's but still too skinny for 3Ts. And a lot of the stuff that fits is entirely the wrong season. So what does fit is worn A LOT and gets very icky. This t-shirt had a chocolate stain on it and was too short, therefore worn only around the house. But then I came across this tutorial and couldn't resist. Cut off the bottom, applique over the stain, add a poofy skirt perfect for twirling...took an hour and a half, mostly because it took me so long to figure how to do satin stitch on my new machine.

Sorry for the blurry picture, she was fast! By the way that's drool on the collar, not a forgotten stain. :)
Pin It!
Related Posts with Thumbnails