Tuesday, August 25, 2009

it's never to early to start the Christmas projects.


IMG_4857
Originally uploaded by Selzhanik
For my birthday, Mom took me to a quilt store in OKC and bought me some Crazy Eight jelly rolls and charm packs. I really wanted some Christmas decorations that match my house better. So I made a table runner for my front table already, and there's enough left to make either a quilt or a bunch of placemats. I'm leaning toward making the quilt, because this stuff may be too pretty to get all foody.

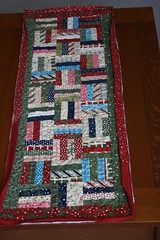
I saved doing the binding on this thing for another long car ride back from Oklahoma. :)
Pin It!

Thursday, August 20, 2009

Kindermat Case

Our preschool requires a Kindermat for naptime, for sanitary reasons, with a washable cover. We leave the mat there, but we take the cover home weekly for washing. I didn't want a big puffy sleeping bag thing to lug home every week, because I am already lugging home backpacks, lunchboxes, half-dry art projects, jackets, etc. So I have always used a king-size pillowcase, which never really covered the whole thing, and didn't look cute at all, but was easily stuffed into a backpack and didn't take up the whole washing machine. Not anymore!!

IMG_4855

Cuteness can be streamlined.

Also, if I ever need to haul the whole thing home, mat and all, it does this:

IMG_4856


To see the photos better, click on the picture to go to flickr. If you are interested in a custom order, post a comment!
Pin It!

Saturday, August 15, 2009

"teecycle"

I have been looking for ways to make better use of our hand-me-downs. The Bug is getting kind of long for 2T's but still too skinny for 3Ts. And a lot of the stuff that fits is entirely the wrong season. So what does fit is worn A LOT and gets very icky. This t-shirt had a chocolate stain on it and was too short, therefore worn only around the house. But then I came across this tutorial and couldn't resist. Cut off the bottom, applique over the stain, add a poofy skirt perfect for twirling...took an hour and a half, mostly because it took me so long to figure how to do satin stitch on my new machine.

Sorry for the blurry picture, she was fast! By the way that's drool on the collar, not a forgotten stain. :)
Pin It!

Friday, August 14, 2009

First tutorial: Simple and Easy Valance

Welcome to my first tutorial! I didn't really plan to make a tutorial today...just making a valance for my daughter's window, and decided to document the process.

1. Measure your window width and how long you want the valance to be. Be sure to include in your length the amount needed for a ruffle at the top and for the rod. My window is about 30" and I wanted a 14" long valance (includes 2" for top ruffle and 3 1/2" for the pocket.)

2. Multiply each of these numbers by 2 and add a seam allowance. 30 x 2 = 60, and 14 x 2 = 28, add 2" to each of those numbers so you can have a 1/2" seam allowance on each of the rectangle's 4 sides, so I will cut my fabric to measure 62" x 30". (Note: doubling the window width gives you a moderately bunchy appearance. If you like super-bunchy, triple it.)

3. Cut your fabric. It just so happened that the twin sheet I chose to use is 64" across, so I just went with that. It was already hemmed! Incidentally, sheets are a great way to get a lot of fabric for a little money.


4. Turn the edges for hemming. I don't like to pin or measure unless I have to, so I went with the "eyeball it and iron" method.


5. Sew the edges. Because I am lazy and went with the sheet, I only had one hem. Score!


6. Fold in half long sides together, and pin. Iron. You may discover your valance is not perfect and that the edges don't match together (especially true when using a pre-hemmed sheet.) It doesn't matter, no one will notice when it is on the window.

7. Measure down from the top the amount you want the ruffle to be. I want 2". Mark with water-soluble pen, or pins, or use the ruler as you go, however you want to do it. I used the highly scientific method of lining my presser foot up with the edge of this row of dots. Now sew with confidence.


8. Now it's time to make the rod pocket. I have one of those flat rods, so my rod pocket will be 3 1/2". If you aren't sure about this measurement, it's better to go a little bigger than smaller. You want the pocket snug, but not miserably tight. Measure down from your last seam and mark as desired. Once again I just eyeballed it with the presser foot.


9. Ta da! You have made a valance. Now put it on the rod and stand back to admire your work. If you want it really poofy, you can add some tissue paper in the pocket made by the fold. At this point you could sew the sides shut if you like, but why bother when it looks so finished already?
Pin It!
Related Posts with Thumbnails